
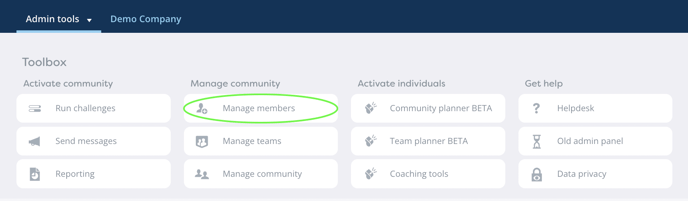
As an admin of your community, you can manage the memberships of your community. On the Manage Members page, you can update changed member data, remove old ones from the community, browse member information in more detail or invite new members (read more about inviting) . Log in to the browser version of HeiaHeia with your login details, open the Admin tools in the top right corner and click on Manage Members.
Updating members' data
You can easily update all your members' data in one go by uploading their data to the system as an excel file.
1. First, on the Manage Members page of the Admin tools, download the List of Members and Teams.- Make all needed changes to the excel list. Fill in at least email, name and language. Please note that your file must conform to the excel template.
- Note: The email address cannot be updated using the tool. Changing email address can be done by the member him/herself or you can always contact the Helpdesk.
2. Save the excel.
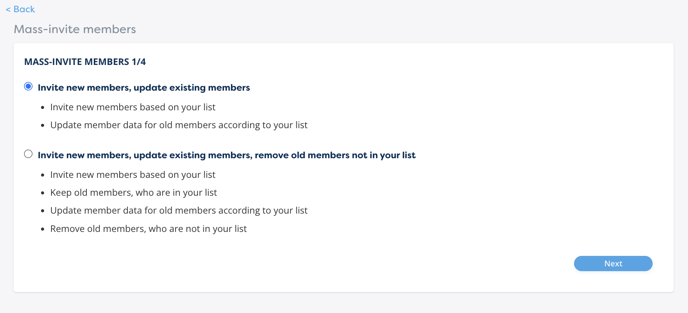
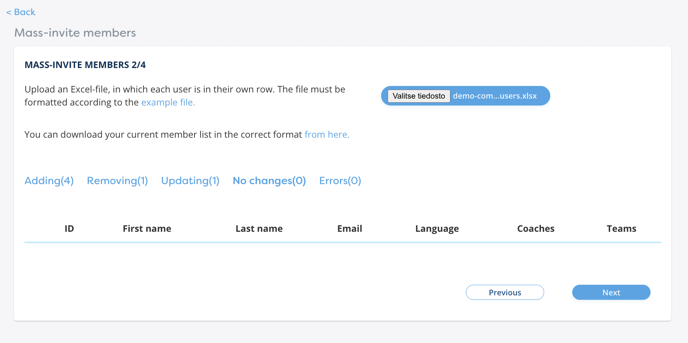
3. Upload the excel to the system under MASS-INVITE MEMBERS (this is also where you invite new members). Choose Invite new members, update existing members and click Next.
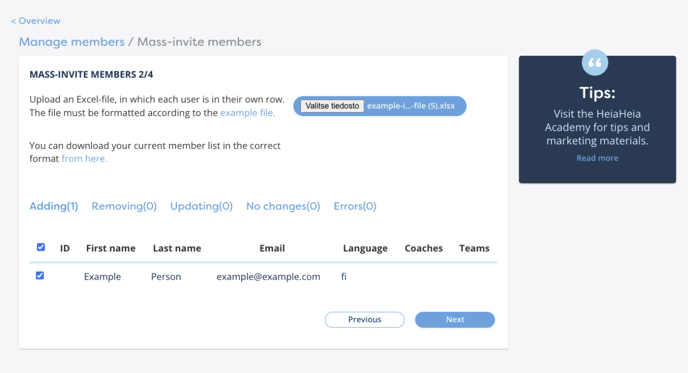
4. Upload your excel. Under Adding / Removing / Updating / No changes / Errors you can check all the data you are going to upload:
5. Click Next and confirm the upload by clicking Next once more to start the upload.
Updating teams
You can use this tool also to update HeiaHeia teams and team members in one go.
1. First, on the Manage Members page of the Admin tools, download the List of Members and Teams.
- Open the downloaded Excel file and edit the teams under the Teams column.
- You can list new and old teams into your Excel spreadsheet.
- If a team does not already exist in HeiaHeia, the system will create it when the Excel file is imported back into the system.
- If a person belongs to more than one team, the team names in the Excel table can be separated by a comma. Please note that for the same reason the team name must not contain a comma.
- If you delete the team from a member in excel, that member will be removed from this team.
- Only official teams are managed by this tool, i.e. you will not accidentally delete or modify unofficial teams created by the users themselves
- By default, a new team is private, i.e. only those invited can join it. This can later be changed to a public team, for example, if needed.
- You can also manage teams or team memberships one by one under Admin tools -> Manage teams (see: Teams in HeiaHeia)
- Save your excel.
2. Removing old members
You can remove all no longer members of the community in one go using the Massinvite Members Tool.
1. First, on the Manage Members page of the Admin tools, download the List of Members and Teams.
- Now you have a list of current members for your community. Open an Excel file and remove all no longer members and save.
2. Upload the Excel file back to HeiaHeia in Admin Tools under Massinvite members (this is also where you can invite new members).
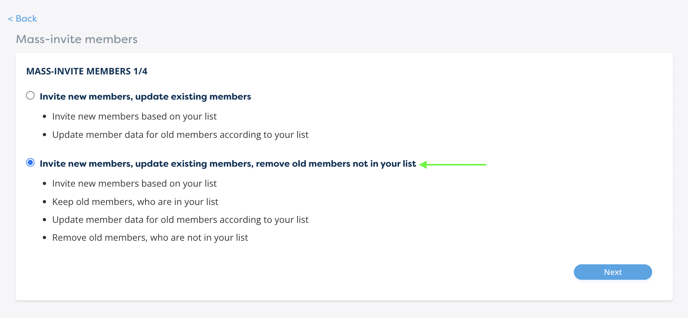
3. Select the second option, Invite new members, update existing members, remove old members not in your list. and click Next.
Note that this function will remove from the community any members who are not in your Excel file. The user account will not be deleted, only the membership in the community is removed.
4. Upload your excel. Under Adding / Removing / Updating / No changes / Errors you can check all the data you are going to upload.
5. Click Next and confirm the upload by clicking Next once more to start the upload.
You can also delete members one by one, see the option Browse members. Open the small blue arrow on the member -> Remove from community.
3. Browsing members
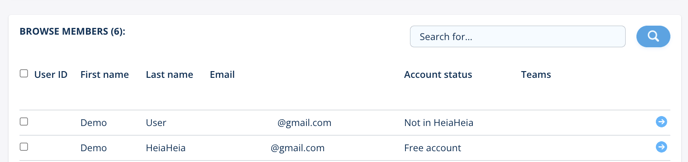
To view the account details of members invited to the community, go to Browse members. Here you can see eg. the status of the account:
1. Community member: The member has opened an account and joined the community.
2. Free account: the user has opened an account but has not yet joined the community, i.e. the e-mail invitation has not been accepted.
3. Not in HeiaHeia: The member has been invited but has not opened an account and therefore has also not joined the community.
To open the account details of a user, click on the small blue arrow next to the member.
Here you can see more details about the user's key data, such as whether they have given their consent to be included in reporting and participant lists with their name (yes/no). You can remove the member from the community or send a password change link. The email change should be done on behalf of the HeiaHeia Helpdesk.